
As a Mac user, I want to know how to find recently deleted files so that I can recover my office documents lost accidentally from my system.
Losing files on Mac can put you in trouble – especially if something important was lost, like your work document, precious photo, or a downloaded email attachment. Ever wondered where these recently deleted files go on Mac? Or what recovery workarounds can you try to get your lost files back? Don’t worry, we are here to help you.
Fortunately, macOS provides several built-in recovery options, and there are some Mac data recovery software tools as well that you can try to recover your recently deleted files. This article will guide you through different recovery workarounds. Let’s get started!
Is it Possible to Recover Recently Deleted Files on Mac?
Yes, it is quite easy to recover lost files on Mac, especially if you act quickly. When a file is deleted on Mac, it typically goes to the Trash folder, where it remains until you empty the Trash. You can easily check and restore files directly from the Trash folder.
Additionally, there are some built-in recovery utilities as well as third-party Mac data recovery software that you can try to recover deleted files by restoring previous versions. The key is to act quickly, as the sooner you attempt recovery after deletion, the higher the chances of successfully retrieving your files.
Quick Methods to Find Recently Deleted Files on Mac
It’s time to explore different methods, including macOS built-in features and third-party tools, that help you locate and restore those lost files with ease and confidence.
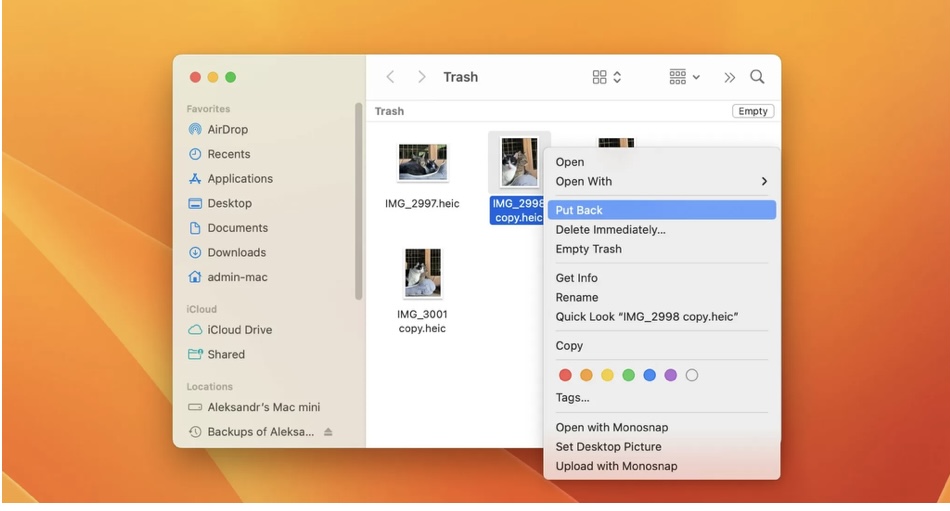
Method 01: Check the Trash Bin
Before applying any method to find recently deleted files on Mac, it’s important to check the Trash folder. Every deleted file on Mac goes to the Trash folder and remains there until permanently removed. To find and recover deleted file from Trash:
This action will return the selected file to its original location, where it was stored before deletion.
Method 02: Check Recently Deleted Folder in Apps (Photos, Notes, Mail, etc.)
Many Mac applications, including the Photos app, include a built-in Recently Deleted folder or section where deleted files are temporarily stored. This folder keeps your deleted photos and videos safe for up to 30 days, allowing easy recovery during that period. To restore your files from the Recently Deleted folder:
That’s it—your deleted files are back!
Method 03: Use the Finder’s “Recent” Feature
Sometimes, your file may not be deleted, but it may be accidentally moved to a different location. If you’ve recently accessed or modified it, it could still appear in the Recentssection on your Mac. To recover your files this way, follow these steps:
● Click the Finder icon from the Dock to launch it.
● Now, go to the Recents section from the left sidebar.

Method 04: Check Time Machine Backup
macOS provides built-in Time Machine backup utility, which, when synced on your device, automatically creates regular backups of your files and folders. Follow the below steps to recover your deleted files using Time Machine backups:

Time Machine is the best macOS data recovery workaround as it allows you not only to restore recently deleted files but also their older versions.
Method 05: Use Third-Party Mac Data Recovery Software
If the aforementioned Mac data recovery workarounds fail to find your recently deleted files on Mac, third-party data recovery tools can help you. There are several Mac data recovery software tools available online, but for advanced recovery needs, the Stellar Data Recovery Professional for Mac tool is outstanding. This all-in-one Mac data recovery software allows you to restore files deleted from many internal or external storage devices, including hard disks, SSDs, USBs, and SD cards.
Key Features of Stellar Data Recovery Professional for Mac:
To recover your recently deleted files on Mac using this amazing Mac data recovery software, you have to:
Step 1: Firstly, download and install the Stellar Data Recovery Professional software on your Mac. Launch the software and select the type of file you want to restore from the homepage, then click Next.

Step 2: Next, choose the storage drive or volume where the deleted files were earlier stored and click Scan to initiate the scanning process.

Step 3: Once the scan is complete, preview the recoverable files and select the ones you want to restore. Click Recover to save them securely to your chosen destination folder.
Preventing Future Data Loss on Mac
While recovery methods exist, prevention is always better. Here are some tips to avoid losing files in the future:
Conclusion
Finding recently deleted files on Mac may seem challenging, but the aforementioned Mac data recovery methods can easily help you get your files. Start with checking the Trash folder, then move to app-specific “Recently Deleted” sections, and Time Machine backups. If these manual workarounds fail, use third-party Mac data recovery software like Stellar Data Recovery Professional for Mac. By following the steps in this guide, you’ll know exactly where to look and what to do when you accidentally delete files on your Mac.